Wednesday, December 17, 2014

Recovering and Bruno Mars

I was in a car accident in early November that more or less derailed my life.  Still trying to recover as I negotiate the twists and turns of insurance. My son and husband had to do all the holiday decorating this year.  I feel frustrated that I cannot do the things I normally do and I'm struggling to find my holiday spirit. We'll get there.

In the meantime, my son has been fixated on Bruno Mars' new video with Mark Ronson. Have you heard "Uptown Funk" yet?


My son is a big fan of Bruno Mars and loves this video.  In the Spring, his school holds a Famous Person day where you are supposed to dress up as a famous person. He wanted to go as Bruno Mars last year but I sent him as John Lennon instead.  He asked again after seeing this video.

Just for fun, I grabbed my old pink GAP blazer and one of my husband's hats.  I dropped by Target on the way home from work and bought a cheap chain necklace and some cheap sunglasses.  We really need a white fedora and a black bandana but it's a start!


Monday, November 3, 2014

Halloween 2014: Goonies Never Say Die!

My son loves "The Goonies." When he first saw it months ago, he immediately said, "I want to be Data for Halloween."  Hmmmm.


We started by finding a small authentic Army coat on eBay.  There are several sites with fans dedicated to authentically replicating Goonies costumes. One of them has identified all the patches on Data's jacket. While I couldn't find all of them, I did accumulate quite a few on eBay and spent a lot of time sewing them on.

I worried that a boxing glove with extender would be too heavy but I found a cheap plastic one at Cost Plus.  I bought some chattering teeth and attached them to a retracting ID card holder for the Pinchers of  Peril!  We grabbed two flashlights at the Dollar Store and I duct-taped them to a homemade belt for the lights.  These really came in handy!  I then bought a cheap red cap and yellow backpack online.  He used the backpack as his trick-or-treat bag.  I grabbed some screen images of the coin and map from the movie and printed them on a color printer and mounted them on foam core.  He carried these in his backpack. They never made an appearance on Halloween but will be fun for costume play.  I attached the Pinchers of Peril and the boxing glove to another homemade belt that I placed across his chest.  Data!!!

I went as Cyndi Lauper:

Found the wig at the costume store but I had everything else. I really wanted some studded belts but couldn't find any in plus size.

My husband went as Brand:

I got our Goonies tshirts on Etsy.

Not everyone recognized us but many people did!  I carried my iPhone around with us and had Lauper's "Goonies 'r' Good Enough" playing on repeat.

The costumes were fun and comfortable and my son was proud that no one else was wearing his costume. The same couldn't be said for the legions of Elsas and ninjas we saw on Halloween!

Wednesday, October 22, 2014

Kidstir Review: October 2014

http://kidstir.com/?raf=555
Recently, I mentioned how we just discovered a new subscription box about cooking for kids. Noodle has gotten interested in cooking every since he saw "Master Chef Jr."  There are few different boxes like this out there but I decided to try Kidstir because I liked the fact that they included little tools and extras in each box.

The theme for October was Spooky Celebration Kit!  Perfect timing!


This month, we made everything in the kit!  We hosted a "Legend of Sleepy Hollow" viewing and Noodlebug made the Yummy Mummies to share.


The kit came with the candy eyes.  Noodle needed some help with the frosting but did almost everything on his own with me as his sous chef.

We bought cider from Trader Joe's and added the Witch's Brew skull and crossbones for a "It's the Great Pumpkin, Charlie Brown" viewing.  Very easy to do and fun. The skull and crossbones didn't really float but the kids liked them.

Finally, we made the Scary-oli.  The kit came with a pasta press. Noodle was so proud of his finished product. And they tasted great!!!

I can't wait to see what November brings!  Here is a sneak preview for December:


If you subscribe now, you are guaranteed to get the December box.

Wednesday, October 1, 2014

Art is You 2014 Recap: Frida Kahlo-llage

Day Two!

For my second class, I decided to really stretch myself by taking a class with Andrea Matus deMeng.  I have been a huge fan of Frida Kahlo since I was thirteen years old so I was immediately attracted by the subject matter of her class. Andrea taught us to collage on a large scale using Frida Kahlo as inspiration. Here is an example of Andrea's work:

(photo borrowed from and owned by Andrea Matus deMeng)


So gorgeous! And it is big!!  We were asked to bring a 20 inch by 36 inch unstretched canvas.  I ended up bringing a 24x36 stretched canvas.


My work table is in the foreground.  Although I dearly love Frida, I have been disappointed at how popular and mainstream she has become over the years. I already have plenty of Frida items in my house. I decided to use my grandmother's face in my piece.

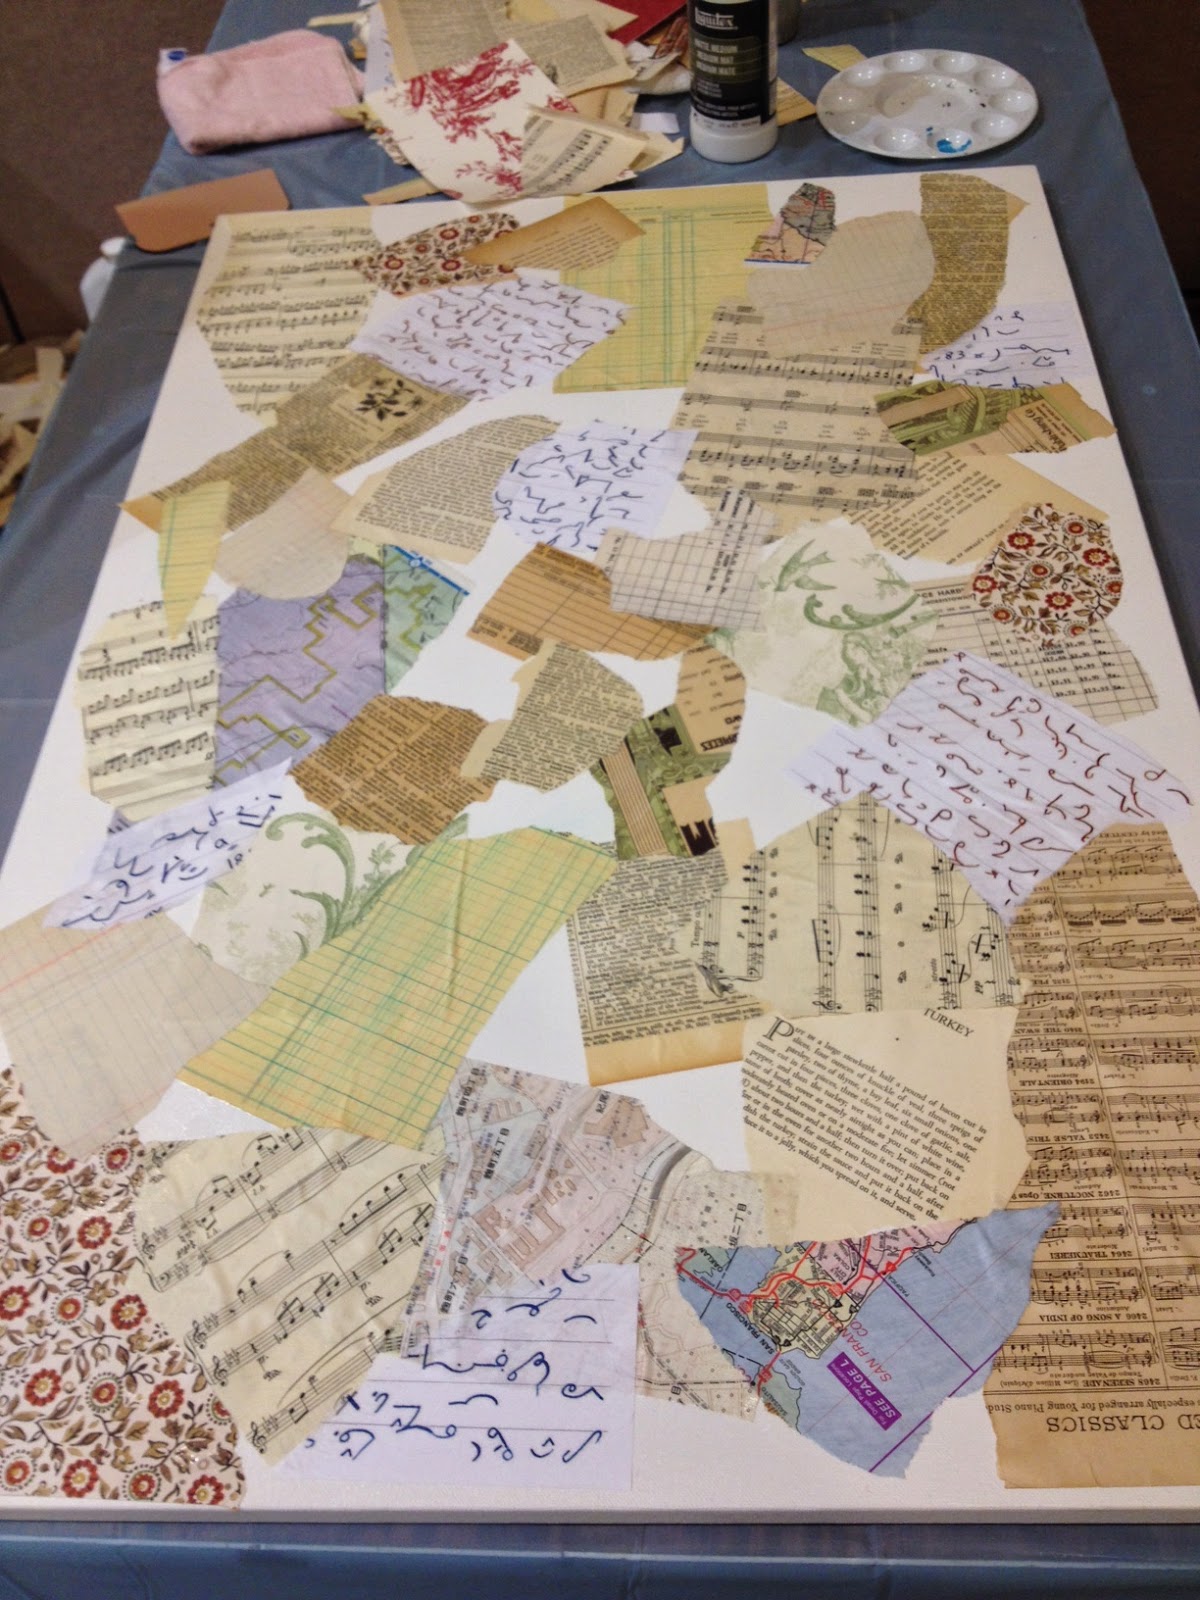
Our first task was to cover the canvas with a variety of papers for the background:

I am a big fan of straight edges and right angles and it has taken me years to feel comfortable with randomly tearing and gluing down paper. I'm pretty fast now!!!  I tried to include a few special items that referenced my grandmother even though they probably wouldn't show.  The writing that looks a bit Arabic is actually shorthand. My grandmother went to business school as a young woman and was very good at shorthand.

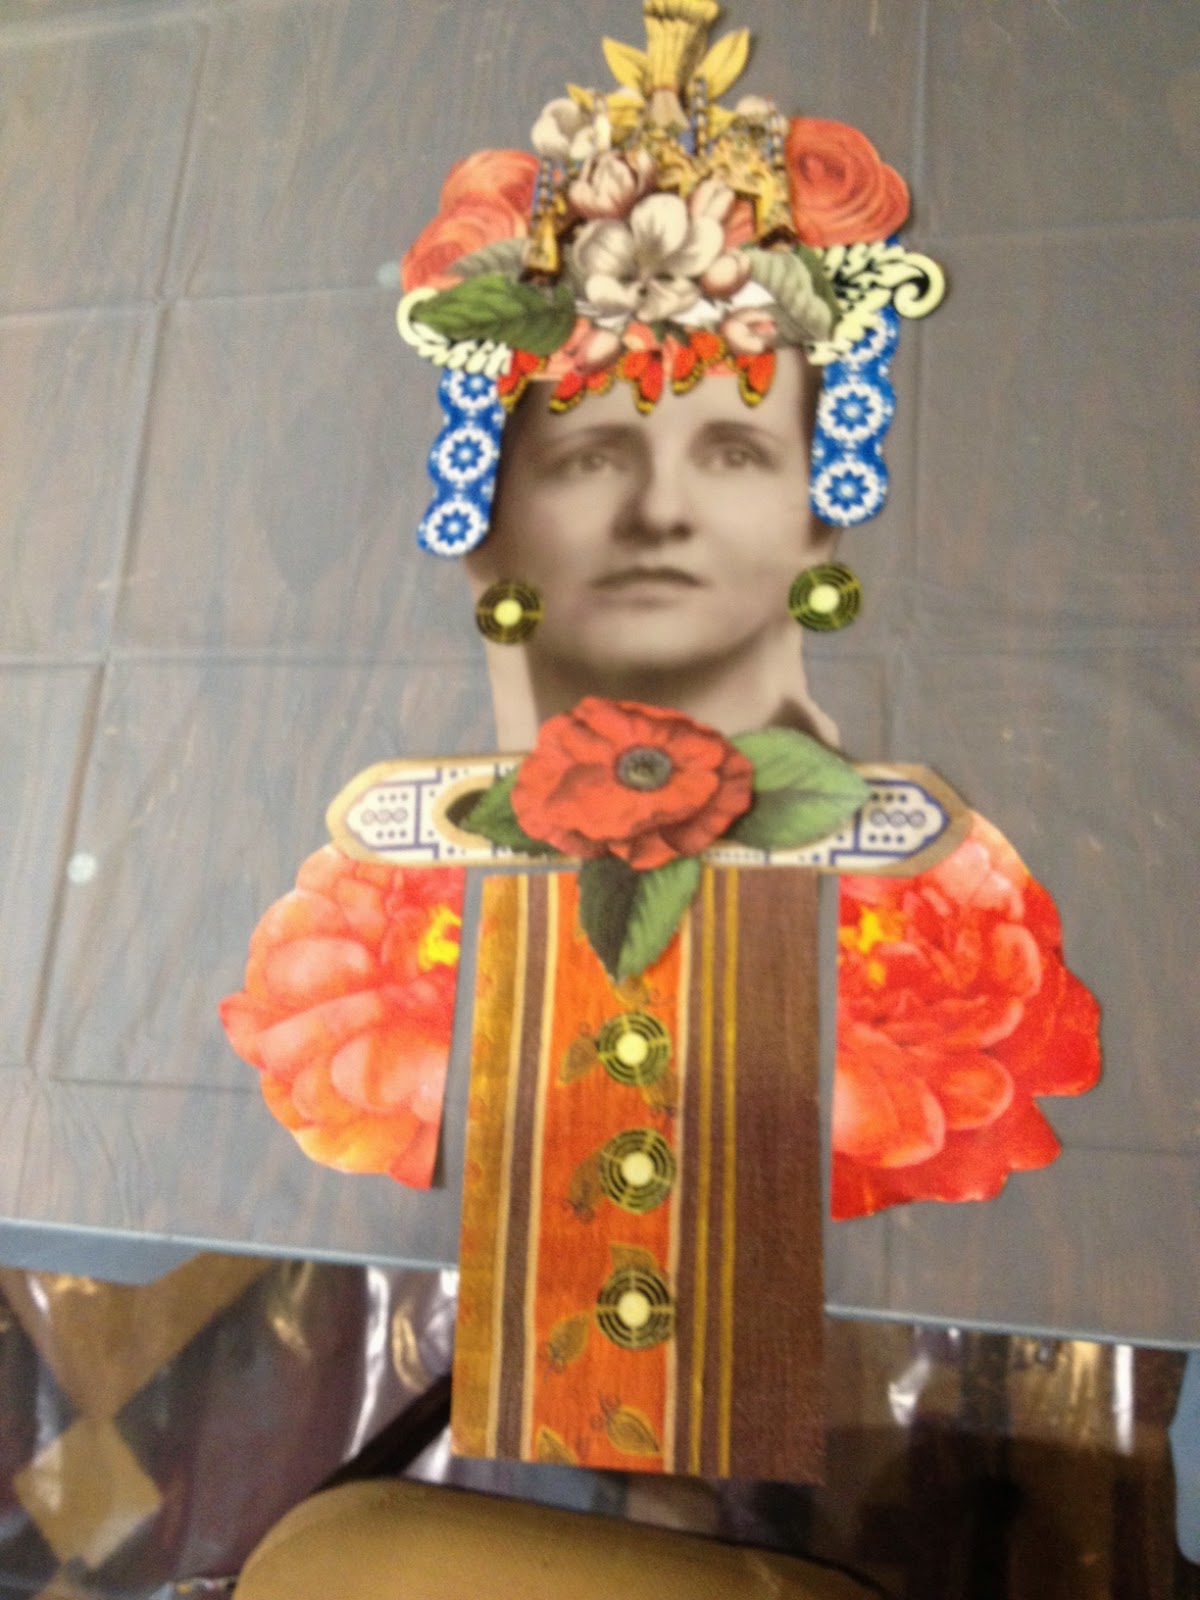
Next, we started laying out our image. Andrea called it "auditioning."  We took the time to cut out images and shapes and lay them out with our face images:


This was REALLY hard for me! I got blocked and needed Andrea's help.  I had so many botanical images but it really needed some architectural elements.  Luckily, a classmate had brought a pile of postcards to share and many were of buildings from around the world!  I used an Indian palace in the headdress and Arabic doorways for the shoulders. Andrea gave me the idea of hanging butterfly wings down over the forehead for a pop of color.

The next frustrating part was the body:


I just couldn't get it to look the way I wanted!!!

Next, we had to sweep aside our "audition" to create a color wash on the canvas:

I don't think I made good choices with my color selection.  My images ended up fading into the background as you will see later.

Then, it was time to start collaging down the elements:

You can see I added onto the body but it still isn't right.  I need something to flesh it out and unify it.  You can also see how the top of the headdress is fading into the background.  I then darkened the upper and lower background color.

In a last minute attempt to unify the torso and emulate with Andrea did with her Frida piece, I tried dripping a dark blue paint along the bottom. It wouldn't drip.  I ended up wiping most of it off.

It did make a nice splash of color on the bottom and I like how it change the color of the hip pieces. The canvas still looked really empty so I added some diamond pieces going down the sides.  AND THEN WE RAN OUT OF TIME!!!

I still need to figure out how to handle the torso.  I am planning on using some pastels to define the outline of both the main image and the diamonds.  I think if I smudge some black around them, the images will pop more. I also need to define the edges of the canvas. And it needs something in the top center!!! I have an idea but we'll see if I can execute it!

I learned a lot from Andrea.  It was intimidating to try something this big. I still struggle with scale and trying to figure out how to the fill the canvas.  I would definitely take another class with Andrea, though!

Attending ART IS YOU Petaluma:

Next year's ART IS YOU will be April 22-26, 2015.  You can join the mailing list now so that you will know when registration opens. I STRONGLY suggest you attend at least two days.  This event is kind of like summer camp for artsy-craftsy types. Most people come and take classes for four or five days.  A lot of bonding occurs.  If you only come for one day, you really miss out on plugging into all of that energy and camaraderie.  I can't wait for next year!!!

Monday, September 29, 2014

ART IS YOU 2014 Recap #1: Tins Charming with Liesel Lund

This years was my FOURTH Art is You Mixed Media Retreat!  I feel so blessed and lucky to have this event in my own backyard!  Each year, I try to take classes that will teach me new skills and push me out of my comfort zone. I also keep coming back for this reason:


Sallianne and Ellen do an amazing job and they do it with humor, grace, and style!

Ellen always makes these wonderful (and collectible!) nametags that I look forward to getting every year. I'm getting quite a collection!


The first class I chose this year was "Tins Charming" with  Liesel Lund. Liesel deconstructs tin containers to upcycle them into the most amazing jewelry and mobiles!


It took most of the day just to deconstruct the tin and learn the techniques so I didn't quite finish.  I brought a few old cookie tins to the class.  I was surprised at all the tools we needed for the project!


 The gloves were especially important.  The raw edges of the tin could be quite sharp!  Liesel showed us how to deconstruct the tin.


Some of the ladies brought amazing vintage tin with great patterns. Mine were all pretty boring.  It wasn't until I took the class that I had good idea of what to look for.  The bright red tin drove my vision. It immediately brought to mind poinsettias.  I decided to make a holiday necklace for my mother.

This is as far as I got:


The leaves are made out of a Trader Joe's Peppermint Hot Chocolate tin. I thought that was very apropos.  The base of the necklace is now done but it needs A LOT of embellishment. As you can see from the above photo of the front of the class instruction booklet, Liesel does an amazing job of embellishing with beads and charms and other doodads.  I hope to fill in space with beads and possibly thread some gold wire through the center of the poinsettias and add some yellow beading.  We learned how to twist wire to make bead drops in the class so I know what to do! A trip to the local bead store is definitely in order!  After this class, I will be on the lookout for interesting tin to use in the future!


Wednesday, September 24, 2014

Kidstir Review: September 2014 Box

https://kidstir.com?raf=555

Noodlebug absolutely LOVED "Master Chef Jr." when it was on last year.  More recently, he got into the "Rachael v. Guy Kids Cook Off."  I think it is fun for him to see fairly young kids cooking some pretty amazing food!  We love subscription boxes in our family so I started investigating what cooking-themed subscription boxes are out there.  There are actually a couple of them!  I decided to try out Kidstir to see if it would encourage Noodle to start cooking.

Kidstir boxes are packaged in a similar fashion to other boxes like Kiwi Crate.  In the initial box, you get a cookbook binder that the child can personalize with his/her name.  Each box also comes with three tool or food items and several recipes linked by a theme.

https://kidstir.com?raf=555

The theme of our first box was "Bake Me Happy."  It came with the binder:

It also came with three recipes. One on banana bread, one on apple crisp, and one on popovers!

It also included a small whisk, a dog-shaped silicone pot holder, and a small tub of chocolate spread. (for use with the banana bread)

The instructions were pretty simple. I tried to let Noodle do as much of it on his own as possible.  (You can see the whisk in the photo below)  I acted as his sous chef by gathering ingredients and tools for him.


There was a moment of panic when Daddy opened the oven without thinking and the popovers started to deflate.  They seemed to rally, though!


Everyone thought they were delicious and Noodle was really proud of his creation!  We are looking forward to trying the other two recipes soon.

I think this box offers a nice introduction to cooking for children. The recipes aren't too difficult and I like that they include useful tools in each box. We are already looking forward to the next one!

I hope they do something fun for the holidays!!!

(I did not receive compensation in any form for this review and all opinions are my own.)

Wednesday, September 3, 2014

Why I Let My 5-Yr-Old Watch "The Goonies"

(image source)

I'm pretty strict about what I let Noodlebug watch. We stick to "G' and "PG" movies and he has yet to see any of the "Star Wars" films.  Our family usually has a Family Movie Night each Friday. My husband makes homemade pizza and we watch a family-friendly film.  We have an impressive collection of animated movies and I love them. Sometimes, I want to watch something different.  One evening, I ran across "The Goonies" On Demand and decided we needed to watch it. I had loved it as a child.  However, I was a bit older than Noodlebug when I saw it. I knew we needed some preparation prior to watching it.

Questionable Things to Watch For:

1. Cursing--My son hears curse words in his day-to-day life.  My husband still hasn't managed to curb that habit. We have discussed with Noodle that these are grown-up words and that he does not have permission to say them. So far, we haven't had a problem. I told him that this movie would have some grown-up words.  He understood.  There is also a little potty humor that went over his head.

2. Villains--The Fratellis are not nice people.  They use guns. They kill people. They torture one of their own. They threaten children. I warned him in advance about this.

3. Dead Bodies--There is a dead body in this movie. It falls out of a freezer onto one of the boys. It could have been scary. I explained it beforehand.  He knew what to expect. It didn't scare him.

4. Sloth--Sloth looks like a monster. His character is introduced in a way that creates a lot of scary suspense. I waited until just before Sloth was revealed and paused the movie. I told Noodle that we would be seeing a man who looks really different. I said that just because he looked different didn't mean that he was bad. We discussed how just because people look different does not mean that they aren't worthy of love, respect, and dignity.  I started the movie again. He wasn't scared at all. But he WAS upset at how badly Sloth was treated.

5. Skeletons--One of Noodle's first movies was NIGHTMARE BEFORE CHRISTMAS so he isn't bothered by skeletons.

6. Suspense--There are some nail-biting moments in the movie that might be scary for some children. I knew my child wouldn't be bothered by that.

These are the reasons WHY I let him watch the movie:

1. The kids go on this adventure to save their homes.  They band together to help their parents and save their community.

2. It requires teamwork for the kids to succeed. They can't do it alone.

3. The kids are loyal to each other. They don't leave anyone behind.

4. EMPATHY!  The kids accept Sloth and end up protecting him.

5. Developing right from wrong---The kids fight the Fratellis and turn them over to the police.

6. They don't give up!!! Goonies never say die!  Persistance, grit, and determination! All hallmarks of successful people.

Bottom line: He loved it.  He always asks to watch it again. And he will be going as Data for Halloween this year.

Would I recommend this movie for every 5/6 yr old child?  No.  We had to do some preparation but I knew he would be able to handle it. I was right. He loved it and so do I.


Friday, August 15, 2014

BACK TO SCHOOL: Kidecals Review


http://www.kidecals.com
Once your child starts preschool, school, or even camp, you will be asked to label EVERYTHING!  A few years ago, when my son started preschool, I purchased some sticky labels from another company. They were little round circles with his name and a car graphic. Although they worked great, their size and shape made teachers overlook them. They would hand me my son's jackets and tell me to please write his name on them. When I pointed out the label, they were always surprised to see it.  I don't like writing names directly on articles of clothing because I always consign outgrown clothes.  With removable tag labels, you can just peel them off when you are done!

This school year, I decided that my 1st grader had outgrown the little circles with the car graphic. It was time for something new.  Luckily, Kidecals contact me right about that time!  It was so hard to decide which labels to pick!  They have labels for everything!!!  We have a lot of school friends with food allergies so I especially appreciate their section of allergy alert labels.  I knew that I wanted waterproof labels for Noodlebug so I headed over to that page and decided on some nice rectangular labels.  (provided courtesy of Kidecals)  I couldn't stop there, though! I have been working on reorganizing my workroom and decided I needed some chalkboard labels too! (purchased by me)

The labels came very quickly and I loved how the ones for my son came in two different sizes on one sheet.  This was important to me because I need different sizes for different things!


I immediately went to work adding the labels to a few jackets. The smaller size worked perfectly on clothing labels.


The larger labels were great for labeling the inside of bags like Noodlebug's Tae Kwon Do bag!


I like how durable the labels feel and easy they are to apply. Since they are waterproof, I will be able to wash the clothes without having to remove the labels.  This would also be great when labeling reusable food containers or water bottles.  I'm going to label everything!!!

I chose the everyday set for $28 which includes 78 labels in two sizes.  (c/o Kidecals) The chalkboard labels I chose run $10 a set for 12 labels. (paid for by me)  Kidecals always offers free shipping.

For a special 15% off discount, use code ilovelabels.

The perfect item for back to school!!!

(Kidecals provided me the opportunity to try the name labels for free. I purchased the chalkboard labels in addition)


Wednesday, August 13, 2014

BACK TO SCHOOL: Backpack Charms

My son will be starting first grade next week. Last year, he was in a big Kindergarten class with three teachers. Now, all the kids will be split up among three classrooms. We don't know if any close friends will be in his new class.  The class lists don't go up until the night before school!  Plus, one of his closest friends is moving to another school.

Although my son is super-social and outgoing, I wanted to help him to reach out and make some new friends this year. I decided to make some quick backpack charms that he could give out to new friends.


 Materials needed:
1.5 inch wooden discs
Ball link keychains
Paint
Printed images
Mod Podge or other adhesive
Crop-a-dile II Big Bite (optional)
1.5 inch circle punch (optional)


I had some 1.5 inch wooden discs left over from another project. I bought them online at Amazon but you can find them at craft stores. 

First, I painted one side of the discs in one of the school's colors. This will be the back of the disc. While it was drying, I manipulated an image of one of my favorite children's book characters and printed out a sheet of the image repeated several times in the size I needed.  I used the circle punch to punch out the images. I ended up adding a little color with markers.  The downside of adding color and using a color ink jet printer is that the color ran a little when I mod-podged it on.  Once the paint on the wooden discs was dry, I used the Crop-a-dile to gently punch holes in the wooden discs.  I then mod-podged the paper circles onto the discs. On the colored side of the disc, I wrote the school name and the school year dates with a Sharpie.  I ended up putting the discs back through the Crop-a-dile to punch the hole through the paper. Finally, I added the ball chain keychain. I got a pack of 28 of them at Joann's.

While they aren't the most professional looking items I have ever done, I think they will be fun items for my son to trade at school. Maybe I'll make a new one each year!

(This post contains affiliate links)

Monday, August 4, 2014

Water Fun!

We are in a serious drought here in California so we don't do a lot of wasteful water play outside. To prepare for a day of water fun, I waited until we had a playdate with several kids and we didn't water our lawn for a week.

First I made a water blob. I made one last year using duct tape. It held up well but sprung a bunch of leaks.  And it was tricky to put together.  This time, I used this tutorial and ironed the edges shut. It worked well but I found that ironing the plastic really thinned it out.  The edges held but a hole appeared in the top almost immediately. Still, it did not detract from the fun. The boys loved it and it was perfect for the 2-yr-old.  Once the fun was finished, we let it drain out in our parched lawn.


I also made some splash balls. You will find dozens of splash ball tutorials online. I cut three sponges into quarters.  (cut sponge in half, cut each half in half)  Lay the three sponges on top of one another.  Tie a length of string around the center and pull tightly.  I wrapped the string around the whole thing once more and tied a knot. Although some people use zip ties, I did not like the idea of the sharp plastic. Regular string worked perfectly!  Fluff the sponges into a ball shape and you are finished.  The kids LOVED them!

I got the sponges in packs of 2 from the dollar store which made them even more affordable.

Next time, maybe I will try to make one of those cool PVC pipe sprinkler structures that I have seen on Pinterest!

Monday, July 28, 2014

Rivertown Revival 2014

We have a truly unique event in Petaluma called Rivertown Revival. This fundraiser for the David Yeardsley River Heritage Center is hard to describe.  To me, it often feels like a turn-of-the-last-century carnival side show mixed up with a classic tent revival.  It is filled with arts, music, oddities, shopping, amazing food, and many many people dressed in costume. You see people dressed as carnies, saloon girls, steampunk explorers, and more.  They even often $5 dollar weddings!  Plus, there are decorated watercraft to look at along the river. This year, one decorated barge on the river held a band. 

I have never missed the event even though it is always one of the hottest days of the year.  When I almost melted a few years back, I gave up wearing my steampunk attire. But I still love to dress up.


I especially love the wonderful decorations they come up with. Last year, they stuck golf clubs in buckets of plaster and strung ribbon between them to form stanchions between the ticket lines.  And look at this wonderful ribbon pole made from a bicycle wheel:

This year, I was determined to get our photos made in the photo booth. Michael Woolsey does an amazing job of capturing people.  I love paging through the photos and marveling at the diversity and beauty of the people who come to the event.   Plus, I get great costume ideas!


I thought about not posting the above photo because it reveals just how heavy I am. Then, I decided that life is too short. I probably won't get too many more photos where my little guy wants to snuggle up with me.  Many people told me he looks like a teenager in this photo:


If you happen to be in Petaluma in July, make sure you don't miss this wonderful and creative event!!!

Wednesday, July 23, 2014

A Wee Bit Warped: THE ZINE!!!

Remember when I went to ART IS YOU a few years ago and made this and this with Shelly Massey?  Shelly is so marvelously creative.  When I saw her whimsical work, I knew immediately she was a kindred spirit.  Plus, our children are the same age! 

I miss getting to take classes with Shelly at art retreats so I was thrilled when she announced her new venture!


Shelly has already planned out 12 exciting issues full of creative/crafty goodness and I love the themes she chose!  Subscribers get a little 'zine mailed to their homes along with treats in the mail, giveaway opportunities, digital freebies like collage sheets and more! You can buy individual issues for $13.50 but then you miss out on the digital area.  And who wants to miss that fun?!

The subscription is $12 per issue and goes through Paypal. If you order before July 31st, you will get a special edition of one of Shelly's art prints!

I already got my welcome packet!

Exciting! Shelly is so talented and such a sweet, generous person!  I am so happy for her. And I'm excited to be one of her first subscribers.

GO HERE TO GET YOUR OWN SUBSCRIPTION!

This is the perfect little gift for yourself or others who love creative inspiration sent to their mailbox every month!


Wednesday, July 2, 2014

Nina Garcia Quarterly #ngq03 Unboxed!!! **SPOILERS**

I love getting surprises so I treat myself to a few subscription box services. One of my favorites is Quarterly!

Today, I got the much-anticipated Nina Garcia #ngq03!


One of the things I love about Quarterly are the detailed descriptions that come with the boxes!

(First peek!)
 Then you get the fun of unwrapping each item!!!


The theme of this box was "Brazil!"  It was very heavy on product.  Overall, I think I'll enjoy the items although some were misses for me.

Contents of box:

1. Coupon code for free Symmetry series Brazilian Pop! otterbox case for iPhone 5/5s or Galaxy S5
2. Black baseball cap from Spenglish with "Muito Cool" brazilian flag on front
3. Red flower refreshing hand and face towelette in Italian blood orange (one sample)
4. Pink High-heeled shoe desk ornament from Brazilian shoe designer MELISSA
5. Formula X from Sephora nail color in "Push the Limits"
6. Hawaiian Tropic Silk Hydration Spray Sunscreen in SPF 30
7. Calvin Klein ONE Pure Color Lipstick in "Dollface"
8. NEST Scented Candle in "Sicilian Tangerine"
9. Surya Brasil Sapien Women Shavel Gel
10. JOICO K-Pak Intense Hydrator treatment for hair
11. ORIBE Dry texturtizing spray (2.2 oz)
12. ELLA earbuds
13. Palm Tree print clutch from PRINT ALL OVER ME (canvas)
14. Koku Pouch--bluie canvas with yellow raffia trim and a plexiglass shark (Not my favorite item)

I know others will price out each item and I will be interested to see the overall value of the box.  I'm excited to try everything out!


Tuesday, July 1, 2014

Let's Cast ALL SOULS TRILOGY!

I would love to see Deborah Harkness' books turned into a series of movies or a television series. But the casting would have to be JUST RIGHT.

I see just one choice for Diana:

I think Mireille Enos is so wonderful.  Her skill as an actress would keep the character from falling into kitsch territory.

Matthew is a lot harder:

1.  Henry Cavill---Has the look but does he have the gravitas?


2. Richard Armitage--Fan favorite but I'm not convinced.


3. Christian Bale--He can definitely handle the brooding/edgy aspects of the role but is he tall enough?


4.Benedict Cumberbatch!  Intriguing.


Now, what about Gallowglass?  My personal favorite.  He would have to be big but also charming.  Hmm....

Yep. Tom Hopper. I can totally see it!


The last book in the ALL SOULS TRILOGY comes out on July 15.  These books are begging to made into movies or a television series!