I got all my inspiration for this project from Laura Winslow Photography.
I always love going through the Dollar bins at Target. You can find the most interesting things there! That is why I thought Laura's idea for a first day of school teacher gift was so perfect! My son starts Kindergarten next week and he'll have three teachers. I wanted to do something special for the first day.
They still had the cute pouches in the dollar bins at Target so I grabbed some for $3 a piece. I then printed out Laura's free tags and attached them using ribbon that I already had.
Laura put cute pencils and lip balm inside of her bags. Personally, I always find myself needing hand lotion during the day. So, I headed to the area at Target that has all the travel sizes and grabbed some lotion and EOS lip balm.
All in all, I think the gifts were about $5 each. It's just a small gift but I'm hoping it will show the teachers that we appreciate them already! Thanks to Laura Winslow for the fun idea!
Showing posts with label tutorial. Show all posts
Thursday, August 15, 2013
Monday, July 1, 2013
7th Anniversary Gift on a Budget
July 3 will be my 7th wedding anniversary. Hard to believe!!! My husband and I always use the traditional/contemporary anniversary gift guides for inspiration. Sometimes, it can be really hard to come up with an idea. Your 7th wedding anniversary is supposed to be copper or wool. My husband asked me if I'd like a sheep. (the answer is yes but we don't have the proper home for a sheep just yet!) My husband loves to cook and I thought about getting him some kind of copper pot or mold. However, money woes continue to plague us. Even though pennies aren't really made of copper anymore, I thought I could do something with them. Noodlebug and I dumped out our penny jar and I had him help me look for certain dates. I decided to go for both of our birth dates, the year we met, the year we got engaged, the year we got married, the year Noodlebug was born and the year of our 5th anniversary. Choose any significant dates that would you like to include. If we had been blessed with another child, I would have used that birth year instead of our 5th anniversary.
I then went to Michael's with a coupon and got this copper-colored frame:
The frame has can accommodate an approximately 4.5 " x 6.5" photograph. I probably could have gone smaller but I wanted room for the print at the bottom. The "7" made of pennies is approximately 4.5" high and 3" wide. I hot-glued the pennies down and then put a small explanation of dates on the bottom. (I apologize for the poor photo.) Some of the pennies were pretty hard to find. I got lucky. My back-up plan was to find a penny for each year we have been married. Hopefully, my husband will appreciate the sentiment behind it. I wonder what HE will come up with?
I then went to Michael's with a coupon and got this copper-colored frame:
Saturday, February 4, 2012
Make a Muppet Face (tutorial)
This isn't really a formal tutorial. It's more of an easy play idea I wanted to pass on.
I took my 3.5 yr old to see THE MUPPETS when it came out and he really enjoyed it. (although probably not as much as I did) He is already a big Sesame Street fan. I have always loved the Muppets because they are all shapes and sizes. There isn't really ethnicity about them. They are all different shapes and sizes and colors. It's wonderful! I love their diversity.
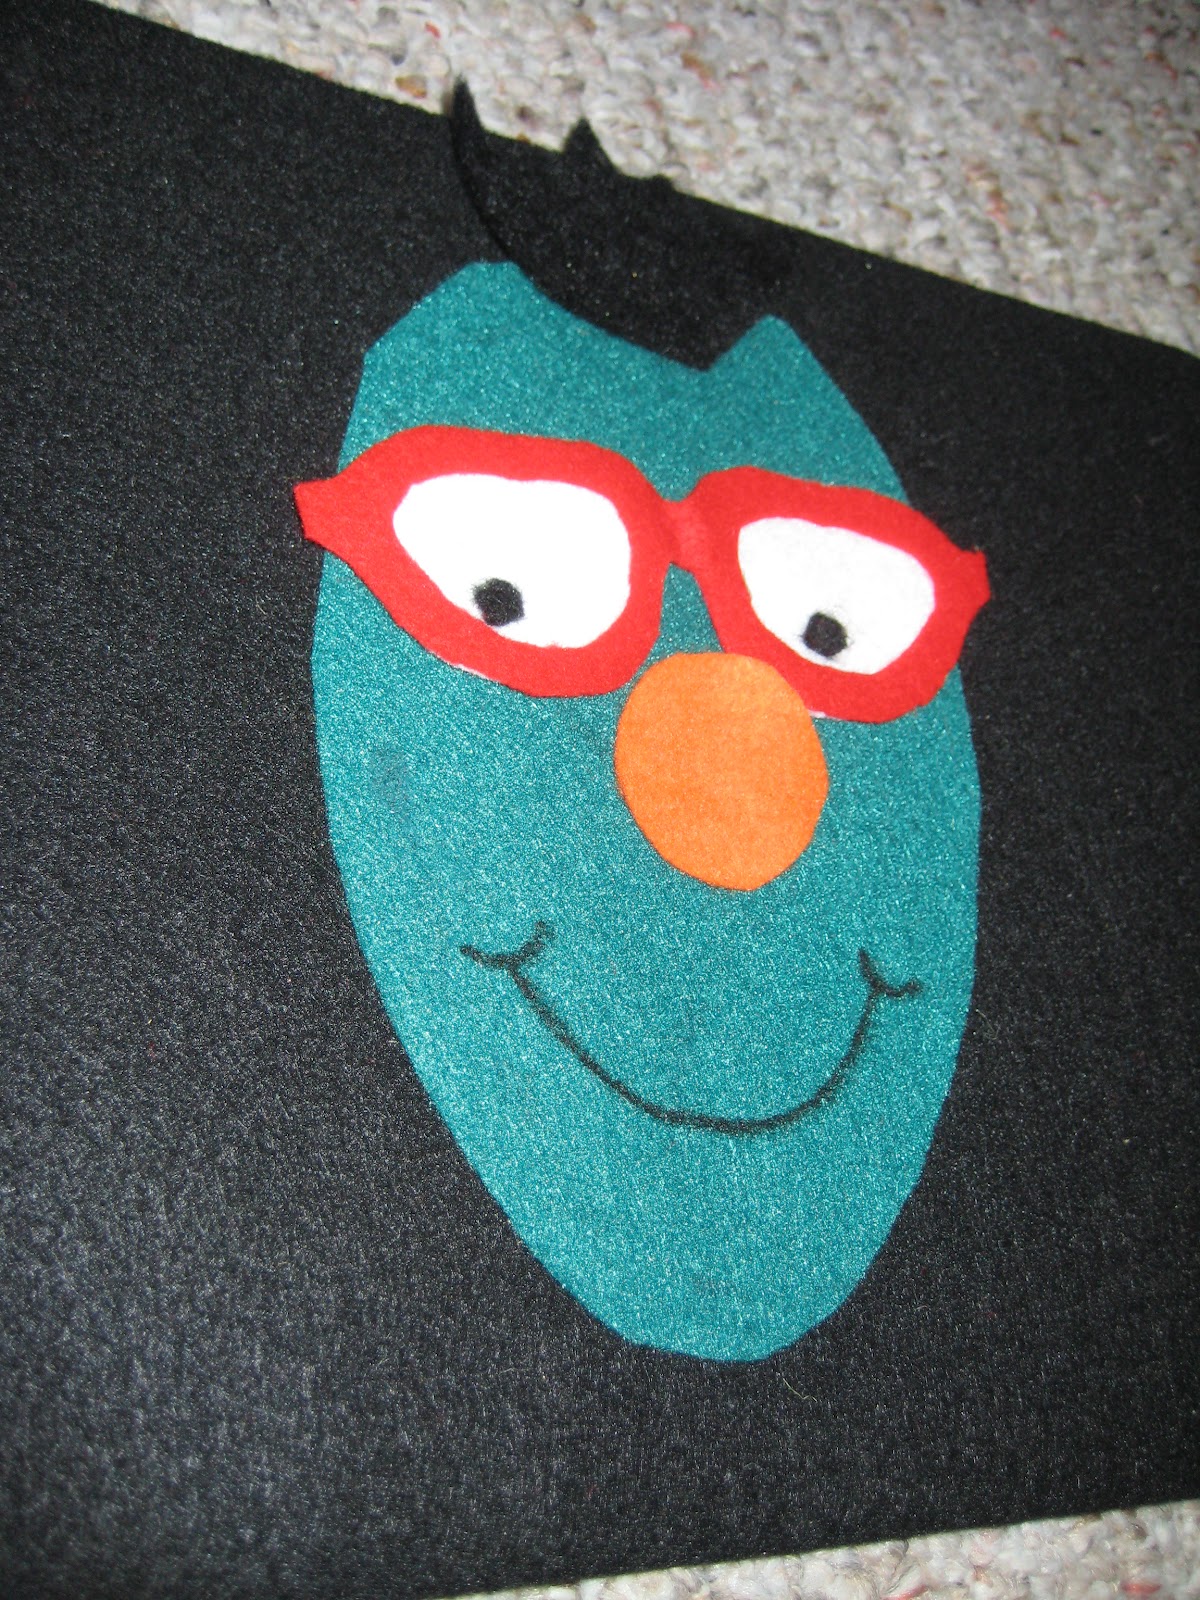
I thought it would be a fun activity for my son to mix and match his own Muppet faces. I cut up a cardboard box and covered some square pieces with black felt using a glue gun. I then cut out 4-5 typical Muppet face shapes and glued them onto the boards. I then covered one large piece of cardboard with black felt that would be the holder for all of the features. Finally, I cut out an array of Muppet features. Eyes. Noses. Hair. Eyebrows. Glasses. Anything I could think of. I ended up drawing the mouths onto the faces. I may make some interchangeable mouths in the future.
Here are some sample faces he came up with:
I based this one on Bert but he has endless options:
I have been pleasantly surprised at how occupied this activity keeps my son. He really enjoys making the faces although he seems really concerned about making them look exactly like his Sesame Street friends. The best part is that you can make this using materials you most likely already have on hand. The possibilities are endless!
I took my 3.5 yr old to see THE MUPPETS when it came out and he really enjoyed it. (although probably not as much as I did) He is already a big Sesame Street fan. I have always loved the Muppets because they are all shapes and sizes. There isn't really ethnicity about them. They are all different shapes and sizes and colors. It's wonderful! I love their diversity.
I thought it would be a fun activity for my son to mix and match his own Muppet faces. I cut up a cardboard box and covered some square pieces with black felt using a glue gun. I then cut out 4-5 typical Muppet face shapes and glued them onto the boards. I then covered one large piece of cardboard with black felt that would be the holder for all of the features. Finally, I cut out an array of Muppet features. Eyes. Noses. Hair. Eyebrows. Glasses. Anything I could think of. I ended up drawing the mouths onto the faces. I may make some interchangeable mouths in the future.
Here are some sample faces he came up with:
I based this one on Bert but he has endless options:
I have been pleasantly surprised at how occupied this activity keeps my son. He really enjoys making the faces although he seems really concerned about making them look exactly like his Sesame Street friends. The best part is that you can make this using materials you most likely already have on hand. The possibilities are endless!
Tuesday, August 31, 2010
Blog Find: Little Bit Funky Photo Ornament
![]() |
| (photo borrowed from and owned by LITTLE BIT FUNKY) |
I am a huge fan of Crystal and her Little Bit Funky blog. She has two adorable boys and comes up with the greatest things for her Etsy shop. My personal favorites are her HoHo Monsters. We own one and I always have to stop myself from buying more. Crystal offers some terrific quick crafting ideas with her "20 Minute Crafter" posts and I loved today's offering. I bought one of these ornaments from Crystal last year and I would love to fill my tree with them year after year. My plan is to use Noodlebug's picture with Santa each year. Now, thanks to Crystal, I can make my own!!! So easy and adorable! I may even make some to donate to my church's craft bazaar.
Head over to LITTLE BIT FUNKY to learn how to make your own!!!
Thursday, April 29, 2010
What I'm Making *UPDATED*
Some friends of mine asked me to make them some yellow rose corsages for a special event. I was going to do some corsages in the "Beth"-style but I couldn't afford to buy a bunch of ribbon and materials. I saw this Little Birdie Secrets tutorial and realized I already had all the materials on hand. I made four of them and will be posting photos later. These would be great for Mother's Day. The hardest part was pushing the pin through the flower to make a hole for the floral wire. I highly recommend that you watch the video tutorial on flower-making that accompanies this tutorial.
(photo above borrowed from and owned by Little Birdie Secrets)
Here are my flowers:
Tuesday, April 27, 2010
Washcloth Bath Puppet Tutorial
Just found this adorable tutorial by Cathie Filian. Aren't they cute? And it's a great way to recycle old washcloths. I better add this tutorial to my list!!!
(photo borrowed from and owned by Cathie Filian)
Wednesday, March 24, 2010
Easter Tutorials
I just found these two adorable Easter-themed tutorials and I am dying to try them. After I finish the never-ending rag quilt of course!
Dana's PEEPS Garland
The Purl Bee's Lamb Pillow
Dana's PEEPS Garland
Find the tutorial here.
(photo borrowed from and owned by Dana of MADE)
The Purl Bee's Lamb Pillow
Find the tutorial here.
(photo borrowed from and owned by The Purl Bee)
Isn't the blogging world just wonderful? I'm going to run over to Joann's on my lunch break!
Thursday, February 25, 2010
Chalkboard Placement Tutorial
Another great find!!! Little Birdie Secrets is just the cutest blog and they have all kinds of tutorials and giveaways. I have been combing through old posts and I'm going to have to tear myself away soon and get some work down. But there are so many things I want to make. Like these adorable chalkboard placements. Easy and cute....my favorite kind of project!
Check out Little Birdie Secrets for yourself!
(photo owned by and borrowed from Little Birdie Secrets)
Thursday, February 11, 2010
Boys Tie Shirt Tutorial
You all know how much I love finding new blogs and new tutorials. I have been wanting to make one of those cute t-shirts for boys with a fake tie on them and now I can thanks to Saltwater Kids!!! There are lots of other great crafty ideas for kids here as well but I will definitely be making a tie shirt for Noodlebug ASAP!
Find the tutorial here.
Thursday, November 19, 2009
Baby Food Jar Candles
You know I love a good tutorial and I just found this one for candles made out of baby food jars. I still have a bag full of baby food jars and I have been wondering what to do with them. This could be a good holiday activity for me when I have my job furlough. (I will be off from December 21-January 3.) The other good part of finding this tutorial is that it introduced me to a new blog! Prudent Baby looks like it is going to be a new favorite!!!
(photo borrowed from and owned by Prudent Baby)
Wednesday, October 28, 2009
Thanksgiving Placemat Tutorial
Another great tutorial!!! Wish I had time to sit down and make these. They remind me of all of the Thanksgiving hand turkeys I made over the years as a child. Find this Raw Edge Applique Tutorial for making a set of special Thanksgiving placemats at Dark Horse Farm Designs.
(photo borrowed from and owned by Dark Horse Farm Designs)
Friday, October 23, 2009
Pumpkin Head Tutorial
I found this wonderful tutorial through the Joli Paquet blog. This tutorial is by the Vintage Dresser and it is fantastic! Aren't these pumpkin heads just adorable?!
Find it here.
Tuesday, October 20, 2009
Great Tutorial from LITTLE BIT FUNKY
Just found this great tutorial from one of my very favorite blogs, Little Bit Funky. It is about how to make reverse appliques on shirts. I'm thinking these could be quick and easy Christmas gifts. This lady comes up with the cutest stuff! I just ordered some of her messy fabric flower pins to give my local girlfriends for Christmas. (hope they aren't looking at my blog!)
(photo borrowed from and owned by Little Bit Funky)
Tuesday, August 4, 2009
DIY Canopy
I have always loved the cool bed canopies and kid forts that you see in many catalogs. Like this wonderful Halloween creation from Pottery Barn Kids:

The Pottery Barn version is $99 which is a bit out of my price range. Luckily, I have run across several DIY tutorials for canopies lately. This one from Country Living magazine uses an embroidery hoop:

I saw a similar canopy in a parenting magazine recently that used a hula hoop.If I find that tutorial, I will post it. Thanks to Monika for the link. See image below. They have a girly version too. In the meantime, my head is buzzing with ideas for my own versions!
By the way, if you haven't picked up a copy of Country Living magazine lately, you are missing out!!! They have redesigned and I found myself marking almost every page in the last few issues.
**UPDATED 8/20/12*** I love FAMILY FUN magazine so much!!! They always have the best ideas. Go here for a no-sew reading nook canopy. Can't wait to try and make this one!!!

The Pottery Barn version is $99 which is a bit out of my price range. Luckily, I have run across several DIY tutorials for canopies lately. This one from Country Living magazine uses an embroidery hoop:

(photos above borrowed from and owned by Pottery Barn and Country Living)
I saw a similar canopy in a parenting magazine recently that used a hula hoop.
![]() |
| (image source) |
By the way, if you haven't picked up a copy of Country Living magazine lately, you are missing out!!! They have redesigned and I found myself marking almost every page in the last few issues.
**UPDATED 8/20/12*** I love FAMILY FUN magazine so much!!! They always have the best ideas. Go here for a no-sew reading nook canopy. Can't wait to try and make this one!!!
![]() |
| (image source) |
Tuesday, June 30, 2009
New Tutorials!
I posted two new tutorials in my sidebar that I found yesterday. The fabulous Maya*Made put up a tutorial on how to create the perfect travel pillow. It is so cute!!! I STILL haven't tried out the new sewing machine yet and I think this could be the perfect project. I'm envisioning Christmas presents!!! Find the travel pillow tutorial here.
Right after I had Noodlebug, someone gave me a wipes case with the cutest fabric cover. I always meant to figure out how to make my own but never got around to it. Now, I don't have to!!! According to Kelly listed a tutorial on making your own custom wipes case. I have found wipes to be the most useful thing under the sun but the cases aren't that glamorous. Until now. Find the tutorial here.
Isn't the internet great?
Right after I had Noodlebug, someone gave me a wipes case with the cutest fabric cover. I always meant to figure out how to make my own but never got around to it. Now, I don't have to!!! According to Kelly listed a tutorial on making your own custom wipes case. I have found wipes to be the most useful thing under the sun but the cases aren't that glamorous. Until now. Find the tutorial here.
Isn't the internet great?
Tuesday, April 28, 2009
Embellished Clothespin Tutorial

Those of you who regularly read this little blog know that I love a good tutorial. This one couldn't be easier and it's so practical!!! I found this little gem over at Pin and Paper and thought they would make great little gifts or favors as well as useful things to have around the house.
Find the tutorial here.
(Photo borrowed from and owned by Pin and Paper)
Friday, February 27, 2009
C is for Crown

Isn't it lovely to find a new blog full of inspiration and tutorials? I stumbled across Juicy Bits yesterday and it is delightful! Jessica has a wonderful tutorial on making felt crowns and I'm dying to make one! (I still haven't broken in the new sewing machine yet and this seems like a good way to do it) I still have a few months before Noodle's first birthday so maybe I can make one in time.
Find the tutorial here.
(Photo and tutorial borrowed from Jessica Levitt of Juicy Bits)
Subscribe to:
Posts (Atom)